High Dynamic Range via Blending in Adobe Photoshop Elements 6
Introduction
Digital images have a considerably smaller dynamic range than slides or colour prints.
One solution to this is to create two or more versions of the same image at different exposures and then blend them together.
In the full Photoshop, the recommended method uses Layer Masks. There are many explanations on the web; one of the simplest is at http://www.luminous-landscape.com/tutorials/blended_exposures.shtml.
However, Elements (at least up to 6) does not support Layer Masks. An alternative method which uses a 'mask' is described below.
.Blending Two Exposures in Elements
Basic Idea
- You need two exposures, one darker than the other. These may come from using a tripod to take a picture twice at different exposures and carefully aligning the two images, or from creating two versions of the same image at different exposures (e.g. by using the Exposure control starting from a Raw image).
- The two exposures are made into two layers of the same image, the lighter above the darker.
- A middle 'mask' layer is created which has only black and white areas.
- The blend mode for the top lighter layer is set to Darker Color. So wherever there is white in the Mask layer, the top lighter layer appears in the final image.
- The blend mode for the middle Mask layer is set to Lighter Color. So wherever there is black in the Mask layer, the bottom darker layer appears in the final image.
- By painting with white or black on the middle Mask layer, you can selectively combine the two images. Wherever you paint with white, the top lighter layer shows. Wherever you paint with black, the bottom darker layer shows.
- Because the original two layers are unaffected, they can be changed at any time. For example, if you think you have over-lightened the top lighter layer, simply make it darker again via the usual Elements controls. If you've made a mistake in combining the two layers, simply alter the middle Mask layer.
Detailed Instructions
- Assume you have two versions of the same image at different exposures.
- Open both in Elements.
- Select the lighter image. Layer menu --> Duplicate Layer... Name the layer “Lighter” (via the As box) and choose the file containing the darker image in the Document box. Click Ok.
- You can now close the lighter image.
- The darker image will now have two layers: Background and Lighter. Select the Background layer and duplicate it. Rename the layer “Mask”. It should be between the Background and Lighter layers.
- Turn off the Lighter layer and select the Mask layer. Filter menu --> Adjustments --> Invert. Then Filter menu --> Adjustments --> Threshold... The idea now is to move the slider until the black and white view picks out as closely as possible the boundaries between the areas you want to use from the lighter image and the areas you want to use from the darker image. Don't worry about black bits in white areas or vice versa; you'll paint those out later. The important thing is the boundary between where you'll use the lighter image and where you'll use the darker image. Click Ok when you're satisfied.
- Now set up the three layers as follows. The top Lighter layer should be turned back on and have the layer merge value set to Darker Color. The middle Mask layer should have the layer merge value set to Lighter Color.
At this point, assuming all the layers are turned on (visible), the composite image will be showing the darker Background layer wherever the Mask layer is black and the lighter Lighter layer wherever the Mask layer is white. - You may be satisfied with the final image. Usually however you will need to adjust the choice between the lighter and darker layers, by creating solid black and white areas in the Mask layer. Do this by selecting the Mask layer and painting on it with a hard-edged brush in either black or white (you want black or white pixels, not gray ones).
Elements makes it easy to choose black and white as the default foreground and background colours, via the icon shown below. Clicking the bottom left selects black and white; clicking the top right switches from black to white and vice versa.
Be careful to paint only on the Mask layer. Wherever you paint in black, the darker layer will be visible. Wherever you paint in white, the lighter layer will be visible. You'll need to zoom in along the boundaries and use a small brush.
It can help to turn off (make invisible) the Lighter and/or the Background layers as you work. - Finally you can either flatten the entire image or save it in a format which supports layers.
Example
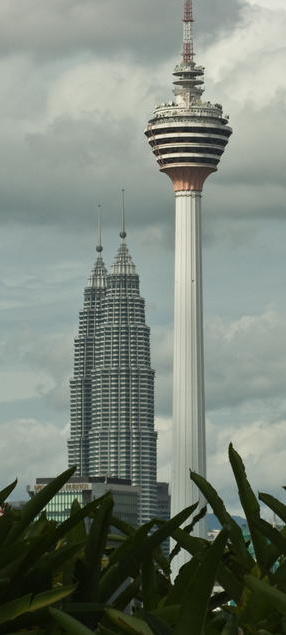
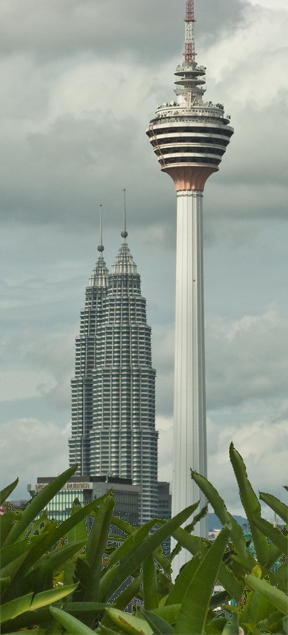
As an example of this approach, an original image is shown on the left below and a blended version on the right. (The size has been heavily reduced for the web; the image was chosen to make a point, not for its quality!) The dark foliage in the foreground has been lightened.
It would be very difficult to trace round the foliage, allowing the tower behind to remain unchanged. However, by starting with a mask made by inverting the background darker layer and thresholding appropriately, the mask needed little painting to achieve the result shown.
If you want to play with this image, you can download the PSD file (1.6 MB), which contains the three layers.